Restoration of a ’66 Jaguar
This is an article about the recovery of a 1966 Jaguar, that originally appeared as a post in on the offsetguitars.com forum. It was written by “sookwinder”, who also took the pictures, and who also gave his kind permission for me to use them here.
When I first viewed Doug’s “rebuild of a 63 Jaguar” web site a year or so back, I knew I wanted to do something similar. So about 6 or 7 months back, during one of Doug#s sojourns, he located a 66 Jaguar that needed some TLC and contacted me to see if I was interested.
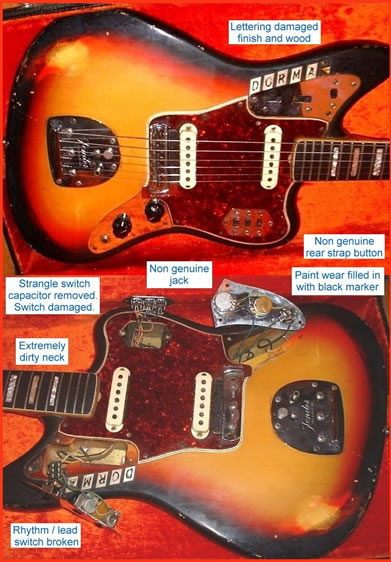
I was interested and a week or so later, Doug was able to pull apart the Jaguar and send me the neck/electronics/guard/bridge etc. In turn he sent the body to Lays in Ohio for a refin. As you can see by the photos the original sunburst was worst for wear with one of the previous owner(s) using a black marker pen to “colour in” the worn black of the burst.
I chose for the refin a vintage Olympic white, but a version of the Oly White that I had seen on a ’66 Jazzmaster which had almost a primrose hue to it. Lays did a great job stripping back the body, managing to keep the neck pocket markings. They shot a nitro finish which included a tinted nitro finish at the end with some “dummy” guard/plates/trem in place to give a shadow effect (similar to that described in Doug’s “63 jaguar” expose).
The colour of the Olympic White that the body ended up with was not exactly the same as the example I had provided, but it is still great, being a very warm/yellow version of Oly White (actually now after looking at the colour in bright sunlight it does appear closer to what I had originally requested… strange the way it “changes colour/warmth” depending upon the light source – far more than other colours).
I requested a slight amount of “checking” to done to the finish, but in the end the degree of checking was minimal.

From the time of shipping the body to Lays, to Doug getting it back was somewhere around seven months. So if you intend to use Lays for any refinishing, do not expect it to occur quickly. The finish did appeared to need a final “buffing”, as pointed out by Doug and although I did toy with the idea of just leaving the finish in the “not so shiny” condition, in the end some elbow grease and the finish is all buffed up (so to speak).
While the body was being refin’d I worked on the other issues. These were the bridge being rusted solid, gunge and grime everywhere, a nut that needed to be replaced, PUP switches not working, upper rhythm control circuit disengaged, a second generation F tuner which had replaced a stuffed first gen F tuner (the enlarged hole in the head stock needed to be dowelled and re-drilled).
Besides the re-dowelling of the headstock, which my father did so superbly that you cannot see the repair at all and it is a shame that the F tuner actually covers up the woodwork, over the past 6 months I have been slowly cleaning / repairing /sourcing the parts which were needed to address all of the issues.
During the process, I discovered that I think that there were in fact two types of first generation F tuners. Both are identical in the sense have the same thin shaft that goes through the headstock (as opposed to the 2nd generation F tuners that are sealed and have a thicker shaft) and are not truly sealed.

I bought of ebay a set of 1966 1st generation F tuners and a second set which were late 1968 1st generation F tuners (both sets had been fitted to teles). Because the 68 set looked cleaner I automatically grabbed one of them and attempted to fit it into to location for the B-string tuner. The screw holes would not line up, because the whole housing had to be rotated ever so slightly to allow it to fit flush with the head stock. I tried all of the remaining five 68 tuners and they all did not fit correctly.
I then grabbed a tuner from the set of 1966 first gen tuners and all six fitted correctly. At this stage I did not understand why there appeared to a difference between the two sets of first gen F tuners. I then removed two first generation F tuners from my almost mint 1966 jaguar and they both fitted easily with all the screw holes lining up.
On closer inspection there were other variations between the 1966 and the 1968 sets of first generation F tuners. The shaft that the actual key part of the tuner (the bit you turn) was both thicker and longer on one set that the other. There are variation is the dimensions of the actual key knob between the two sets. There also appeared to be a slight variation in the parallelogram shape of the stamped outer housing between the two sets, which would account for the observation that a tuner from the 68 set would not fit parallel with the set from 66.
So if you are sourcing replacement first gen F tuners, beware that they may not fit exactly.
Anyone attempting to restore a vintage Jaguar should read/memorise Doug’s brilliant expose as well as the wiring diagram from the Jaguar. These two documents were invaluable as I started to fit together the electronics into the Jaguar last evening.

Once I started, even though I had initially thought that I would only install the lower controls, I ended up fitting all of the electronics, trem unit, bridge, pups, and guard.
One thing that did surprise me was that the guard had shrunk over the 6 months it had been off the body, which sort of surprised me as I thought only the earlier nitro guards shrunk (any one have any ideas on this- huh?) An hour of careful filing of the bridge leg holes and the PUP selector plate hole (and a few beers while watching Veronica Mars on TV Wink) and the guard fitted snugly.
The bridge unit cleaned up beyond all expectation and using the methodology explained by Doug, the PUPs also cleaned up well.


This jaguar only has four glazier points, as opposed to the six points shown in the wiring diagram: One in the lower control, one in the PUP selector route and two in the upper control routing. Maybe a CBS cost reduction?
Next the neck will be attached and a new bone nut fitted (by the guitar tech I use).
[later]
Ok everyone, the neck was fitted and the Jaguar was sent to my luthier who refretted the neck, fitted a new fender bone nut, adjusted the truss rod slightly and did a truly superb overall set up. The Jaguar plays like a dream, with no frets “fretting out” when bending strings, which occasionally happens on my other 66 jaguar.
An interesting observation is that the sound of the PUPs in this 66 differ somewhat to the other one I have, with these having almost a strat like qwak about them, but still retaining the Jaguar colour. With the neck cleaned up and the new frets fitted it is now my choice of guitar when I slouch back on the couch, with the TV remote and a cold one not too far away.
I have found it somewhat difficult to take photos of the vintage olympic white finish. If the light is too bright, it turns the finish almost snow white, so a more subdued lighting was required. Enjoy, as I have restoring this offset orphan.
Forgot to add… much appreciation for the help, advice and occasional spare part that Doug has given over the past 10 months. Thanks mate.
(One more thing…. the carpet shown in one of the photos ain’t my carpet, it’s at my brother’s place… just incase anyone wanted to make any comments)


